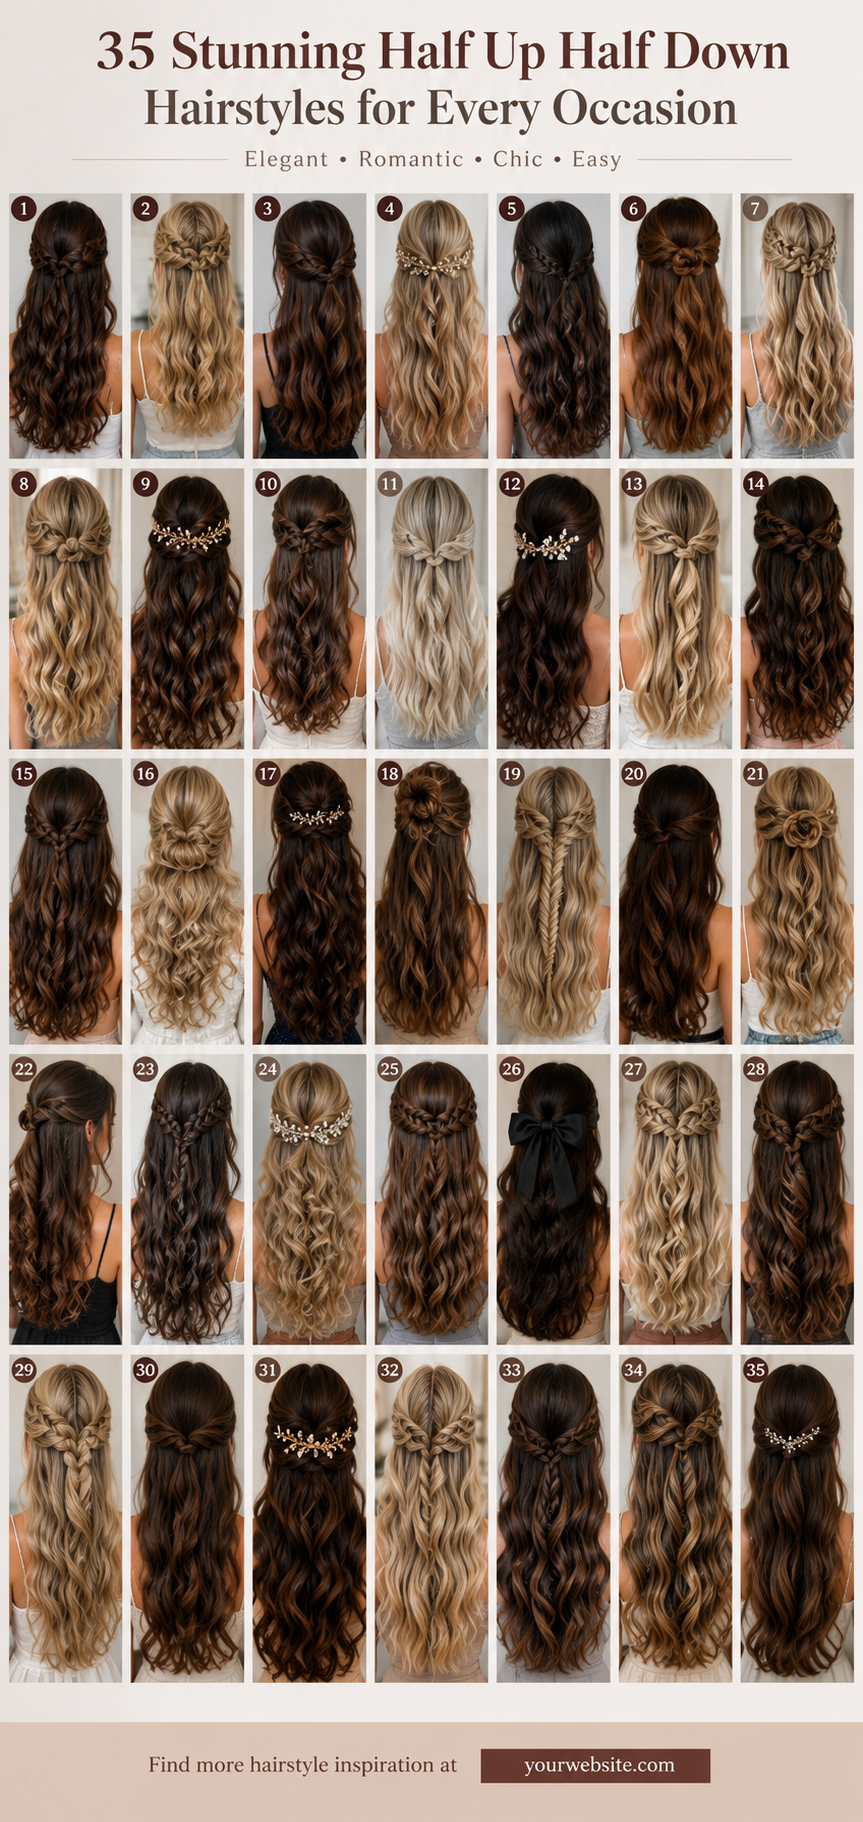
Persona Outfit

Gel X Vs Acrylic Nails: Which False Nail Tips Are Best for You?

Gel X Vs Acrylic Nails

Have you ever spent hours trying to get your nails just right, only to have them chip or break the next day? It’s frustrating when your nails don’t last, especially after all the effort. Choosing the right nail tips can change that experience completely. The right set makes your nails look beautiful and stay strong longer. It also saves time and stress in your daily routine. If you’re torn between gel X and acrylic nails, you’re not alone. This guide will help you find the best option for your lifestyle and style. Later, you’ll see some great product picks like Ranrose Long Straight Nails Tips and Beetles Gel Nail Tips that are easy to use and look amazing. Keep reading to find the perfect nails that fit you best. Ranrose Long Straight Nails Tips The Ranrose Long Straight Nails Tips are ideal for individuals looking for a professional-quality nail enhancement solution. Whether you are a nail technician or a beauty enthusiast who enjoys DIY manicures, these 240PCS Full Cover Soft Gel Nail Tips offer a versatile and easy-to-use option for creating stunning acrylic nails with a natural, elegant finish. Perfect for those who prefer a matte look and want a reliable set of pre-shaped, XXL straight shape false nails in multiple sizes. Pros: Includes 240 pieces in 12 sizes to fit various nail shapes and lengths. Made of soft gel material that is flexible and comfortable to wear. Half matte finish provides a trendy, sophisticated look without the need for additional polish. Pre-shaped XXL straight shape tips make application faster and easier. Suitable for professional acrylic nail extensions and press-on nail designs. Cons: May require trimming or filing for a perfect fit on smaller nails. Not reusable once removed, which may increase cost over time. Some users might prefer a glossier finish over the matte texture. The Ranrose Long Straight Nails Tips stand out due to their extensive size range and high-quality soft gel construction. These nails provide a full cover that ensures a smooth base for acrylic applications, reducing the risk of lifting and enhancing durability. Their pre-shaped design saves time during application, making them suitable for both professional use and at-home nail art enthusiasts. The half matte finish adds a modern touch that can easily be customized with nail polish or left as is for a chic, understated style. Additionally, the large quantity of 240PCS ensures you have plenty of options for practice, replacements, or creative nail art projects. The soft gel material offers flexibility, preventing breakage and allowing for comfortable wear throughout the day. Overall, these false nail tips are a practical choice for anyone seeking a high-quality, customizable nail extension solution with a fashionable finish. To buy this product, click here. Beetles Gel Nail Tips Flat-x Square Medium The Beetles Gel Nail Tips Flat-X- Square Medium are perfect for individuals who love DIY nail art and want a professional-looking manicure at home. Ideal for beauty enthusiasts, nail artists, or anyone seeking a quick and easy nail extension solution without visiting a salon. These pre-etched, half matte, full cover soft gel nail tips cater to users who appreciate convenience, variety, and quality in their nail products. Pros: Comes in 320pcs with 16 different sizes (00-14) ensuring a perfect fit for every nail Made with soft gel material for a natural, comfortable feel Pre-etched surface enhances gel polish adhesion and durability Clear, transparent color allows for versatile designs and easy customization Flat-X square shape provides a modern, stylish look Easy to apply and remove, perfect for DIY salon art Cons: May require some practice for beginners to apply perfectly Not reusable once removed Limited to medium size length, may not suit those wanting longer tips The Beetles Gel Nail Tips offer a comprehensive set of 320 pieces across 16 sizes, ensuring a customized fit for every nail shape. Their pre-etched half matte surface is designed to improve the adhesion of gel polish, which means longer-lasting wear and fewer chips. The transparent color of these nail tips makes them an excellent base for a variety of nail art designs, allowing users to unleash their creativity without limitations. Crafted by Gelab cosmetics LLC under the reputable beetles Gel Polish brand, these nail tips are made from a soft gel material that mimics the natural nail texture. This provides both flexibility and comfort, reducing the risk of breakage. The Flat-X square medium shape is trendy yet practical, offering a balanced length that works well for everyday wear or special occasions. Overall, these nail tips are an excellent choice for anyone looking to achieve salon-quality nail extensions effortlessly at home. To buy this product, click here. Frequently Asked Questions What Are The Main Differences Between Gel X And Acrylic Nails? Gel X nails are pre-shaped, soft gel tips offering a natural look. Acrylic nails are a powder-liquid mix, harder and more durable. Gel X is easier to apply and remove, while acrylic nails last longer with strong adhesion. Are Gel X Nails Safer For Natural Nails Than Acrylics? Yes, Gel X nails are gentler and less damaging to natural nails. They require minimal filing and use less harsh chemicals. Acrylic nails involve more filing and strong adhesives, which can weaken natural nails over time. How Long Do Gel X Nails Typically Last Compared To Acrylics? Gel X nails usually last 2-3 weeks before needing a refill or replacement. Acrylic nails can last 3-4 weeks with proper care. Acrylics are more durable but may cause more damage during removal. Can I Apply Gel X Or Acrylic Nails At Home? Yes, both can be applied at home with proper kits. Gel X tips are easier for beginners due to their pre-shaped design. Acrylic nails require mixing powders and liquids, needing more skill and practice. Which Nail Tips Are Best For Press-on Extensions, Gel X Or Acrylic? Gel X tips are ideal for press-on extensions because they are lightweight and flexible. Acrylic tips are rigid and better suited for long-lasting salon applications. Gel X … Read more

Beetles Vs Modelones Gel Polish Comparison 2026: Which Is Better?

Beetles Vs Modelones Gel Polish

Beetles Vs Modelones Gel Polish offers two different approaches to gel nail care. One provides a wide color selection, while the other focuses on a single translucent shade. Both are designed for at-home use with LED lamps. The core difference lies in color variety versus simplicity in shade. After reading, you will understand which gel polish suits your daily nail routine better. Choosing Your Gel Polish Based On Needs Choose the Beetles Summer Gel Polish Set for a broad palette of colors and finishes. Pick Modelones Transparent Jelly for a natural, sheer nude look. Select Beetles if you prefer experimenting with nail art and styles. Go with Modelones for a straightforward, easy-to-apply jelly polish. Choose Beetles when you want both base and top coats included in one set. Everyday Experience With These Gel Polishes Using the Beetles Summer Gel Polish Set daily means having many colors at hand. It includes gloss, matte, and holographic top coats. This makes it easy to switch styles and match different occasions without extra purchases. The Modelones Jelly Neutral polish fits well into a simple routine. I find its smooth application and subtle color ideal for a natural look that lasts. It feels light and avoids the heaviness of thick colors, suitable for daily wear. Key Features Of Beetles Summer Gel Polish Set Check price on Amazon Best Use Cases for Beetles Gel Polish Ideal for users who want a variety of colors in one kit. Suitable for creating different nail looks using gloss, matte, and glitter finishes. Good choice for gifting due to its comprehensive set. Limitations to Consider Requires a UV/LED lamp for curing. Potential for allergic reactions if not careful with skin contact. Complexity may overwhelm beginners wanting a simple color. Overview Of Modelones Transparent Jelly Gel Polish Check Latest Price Where Modelones Gel Polish Works Well Great for users seeking a natural, sheer nail look. Easy to apply with a smooth, high-pigment formula. Good for avoiding air bubbles and peeling issues. Suitable for daily wear with a subtle shine. Points to Watch Limited to a single nude jelly shade. Requires skin testing before use to avoid reactions. Comparing Beetles And Modelones Gel Polishes In Daily Use My comparison focused on color options, ease of use, finish, and durability over regular wear. Both products require curing under LED lamps. I assessed how each suited different nail style preferences and maintenance routines. How Variety Affects Nail Styling Does color range influence your choice? Aspect Beetles Summer Gel Polish Set Modelones Transparent Jelly Gel Color Options 32 colors with multiple finishes Single sheer nude shade Finish Types Glossy, matte, holographic glitter Glossy jelly finish only Style Flexibility High Limited to natural looks Best For Creative nail art Minimalist nail style Ratings: beetles Summer Gel Polish Set – 8/10 | modelones Transparent Jelly Gel – 7/10 Edge: Beetles suits those looking for variety, while Modelones fits simple, natural preferences better. Application and User Experience How easy are they to apply? Aspect Beetles Summer Gel Polish Set Modelones Transparent Jelly Gel Brush Design Standard brush included Easy-glide brush for smooth strokes Application Smoothness Good but requires care with multiple colors Very smooth and even Skill Level Better for some experience Beginner-friendly Drying Time 60-120 seconds under lamp About 3 minutes with lamp Ratings: beetles Summer Gel Polish Set – 7/10 | modelones Transparent Jelly Gel – 8/10 Edge: Modelones offers simpler application, good for quick routines. Durability and Maintenance How do they hold up over weeks? Aspect Beetles Summer Gel Polish Set Modelones Transparent Jelly Gel Longevity Up to 28 days with proper care 28+ days claimed Chip Resistance High with base and top coats Good but single polish Shine Retention Glossy shine maintained Unrivaled shine Upkeep Low with proper curing Low Peel-off Issues Minimal if used properly Formulated to avoid peel-off Ratings: beetles Summer Gel Polish Set – 8/10 | modelones Transparent Jelly Gel – 8/10 Edge: Both are reliable for long-lasting wear when applied correctly. Health and Ingredients Considerations Are the polishes safe for sensitive skin? Aspect Beetles Summer Gel Polish Set Modelones Transparent Jelly Gel Allergy Warning Possible skin reactions; caution advised Recommended skin test before use Ingredients Professional gel polish ingredients Paraben & toxin-free formula Cruelty-Free Not specified Certified cruelty-free Odor Level Not specified Low odor Ratings: beetles Summer Gel Polish Set – 7/10 | modelones Transparent Jelly Gel – 8/10 Edge: Modelones offers a gentler formula for sensitive users. Long-term Use And Trust In Gel Polish Learning to use the Beetles Summer Gel Polish Set involves understanding multiple colors and finishes. It requires some time to master layering and curing for each type of top coat. Once familiar, it offers consistent results and creative freedom. Modelones Transparent Jelly Gel is simpler to get used to. Its straightforward application and consistent finish build trust over time. It brings peace of mind for those who want a reliable, no-fuss gel polish experience. Choosing Between Beetles And Modelones Gel Polish The Beetles Summer Gel Polish Set suits users who enjoy variety and experimenting with nail art. It offers a rich selection of colors and finishes, ideal for changing looks regularly. It fits those comfortable with a slightly longer application process for creative results. The Modelones Transparent Jelly Gel is better for those preferring simplicity and a natural look. It is easy to apply and maintain, perfect for daily use without much fuss. It appeals to users seeking a subtle, sheer polish with fewer decisions to make. Both choices provide practical gel polish solutions depending on your style preferences and daily routine. Common Questions About Beetles Vs Modelones Gel Polish Which gel polish set has more color options? Beetles Summer Gel Polish Set offers 32 different colors with various finishes. Modelones provides a single nude jelly shade. Are both polishes easy to apply at home? Modelones is simpler with a smooth, easy-glide brush. Beetles requires more care due to multiple colors and finishes. How long do these gel polishes last? Both claim up to … Read more

Top 10 Base Coat Gel Nails Kit for Stunning Nails 2026 Reviews

Picking the right gel nails kit can feel overwhelming. You want nails that look good and last, but the choices are many. Maybe you’ve tried a kit before and faced peeling, uneven shine, or long curing times. It’s frustrating when something that should be simple becomes a challenge. Choosing a gel nails kit often means balancing ease of use, durability, and finish quality. Some kits cure quickly but may not last long. Others offer strong protection but can be tricky for beginners. Price is another factor—affordable options might lack some features, while premium sets may include extras you don’t need. This article will help you understand the key points to consider. It aims to make your decision clearer by highlighting what matters most in a top and base coat gel nails kit. What Really Matters When Choosing A Gel Nails Kit Focus on how well the base and top coats work together to protect your nails and hold color. Ease of application and curing time are important, especially if you do your nails at home. Also, consider the formula’s safety and whether it fits your nail type. The products below are grouped to suit different preferences and needs. Some prioritize long-lasting wear, others focus on beginner-friendly application or natural ingredients. Your ideal choice depends on what fits your routine and style best. Beetles Gel Top & Base Coat Set This Top 10 And Base Coat Gel Nails Kit is ideal for beginners and DIY enthusiasts seeking a long-lasting, shiny gel manicure. Check Latest Price The Beetles Gel Top & Base Coat Set includes both a no-wipe top coat and a base coat designed to enhance the adhesion and durability of colored gel nail polish. It solves the common issue of gel polish lifting and chipping by providing a glossy, flexible protective layer that lasts over 28 days with proper use. Applying this kit is straightforward, thanks to the self-leveling brush that delivers bubble-free results even for beginners. It cures quickly under LED lamps without leaving sticky residue, making the manicure process faster and more reliable. I found it saved significant time compared to traditional gel routines while ensuring a salon-quality finish. Key Benefits Long-lasting shine and protection for over 28 days Easy, bubble-free application ideal for beginners Prevents scratches and stains with flexible top coat Functional gel suitable for nail gel manicure and false nail art Includes 2 x 15ml bottles: base coat and top coat Who Should Consider This Kit? This gel top and base coat set is perfect for those new to gel nails or anyone who prefers a quick, reliable manicure at home or in a professional setting. If you want a durable, shiny finish without complicated steps, this kit removes much of the guesswork and frustration. However, if you don’t own a UV or LED nail lamp or prefer traditional nail polish, this might not be the best fit since the product requires curing under a lamp. A practical tip: avoid touching your nails for 2 minutes after curing to maximize shine. Overall, this set offers peace of mind with its proven formula and user-friendly design, making gel nail application less stressful and more accessible for everyone. Jodsone Nail Primer Base & Top Coat Set A great choice in Top 10 And Base Coat Gel Nails Kit for DIY nail art lovers seeking durable and glossy nail finishes. Check Latest Price The JODSONE Nail Primer Base & Top Coat Set combines essential nail care products in one kit designed to extend the wear time of your gel polish. It includes a nail prep dehydrator, primer, base coat, and gloss top coat, ensuring a smooth application and long-lasting shine. This set is ideal for those who want to achieve salon-quality nails at home with reliable adhesion and durability. Using this kit feels straightforward and efficient, providing confidence with every step. The quick-drying formula saves time while the glossy finish adds a professional look. Whether you’re a beginner or experienced in DIY nail art, this combination helps nails stay vibrant and chip-free longer. Includes 4 bottles: dehydrator, primer, base coat, and top coat Extends gel polish wear and enhances shine Made with safe plant-based ingredients for nail protection Suitable gift option for nail enthusiasts Who This Kit Is For This set is perfect for anyone looking to improve the durability and appearance of their gel nails without frequent touch-ups. It’s especially useful for DIY users who want a complete base and top coat solution in one purchase. However, if you require colored gel polish, remember it is sold separately, so this kit works best as a complement to your existing polishes. For those unsure about application, the included user manual provides clear instructions, helping to reduce confusion and nail damage. A practical tip: always allow each layer to dry thoroughly before applying the next for the best results. Rest assured, this kit supports safe and healthy nail care with plant-based materials, making it a dependable addition to your nail routine. Modelones Clear Base And Top Coat Set If you’re looking for a Top 10 And Base Coat Gel Nails Kit that suits both beginners and pros, this modelones set offers a reliable solution for long-lasting gel nails. Check Latest Price This product is a gel nail polish set that includes both a base coat and a top coat designed to enhance adhesion and seal your manicure with a super shiny finish. It solves the common issue of gel polish peeling or chipping prematurely by offering a no-chip base gel and a flexible, wear-resistant top coat that can keep your nails glossy for over 30 days. Using this set feels straightforward and reliable whether you’re a nail art enthusiast or a beginner. The acid-free formula is gentle on nails, reducing irritation, and the no-wipe top coat saves time without sacrificing shine. I found it easy to apply evenly, and the cured finish looks professional and durable. Includes both 15 ml base coat and top coat for a complete … Read more

how to take nails off without nail polish remover​

how to take nails off without nail polish remover​

Struggling to remove your nails but don’t have any nail polish remover on hand? You’re not alone, and thankfully, you don’t need to rush to the store or damage your nails to get them off. Whether you’re dealing with press-on nails, acrylics, or just a stubborn polish, there are simple, effective ways to take them off using things you probably already have at home. In this guide, you’ll discover easy, gentle methods to remove your nails without harsh chemicals—saving your nails and your patience. Keep reading, because the solution might be closer than you think! Soak Nails In Warm Soapy Water Soaking nails in warm soapy water is a simple and gentle way to remove nail polish. This method softens the polish and makes it easier to lift off without harsh chemicals. It also helps loosen any glue or residue from fake nails. The warm water combined with soap breaks down the polish’s grip on your nail surface. This process is safe for natural nails and skin, reducing damage and dryness. Prepare The Soaking Solution Fill a small bowl with warm water. Make sure the water is comfortably warm, not hot. Add a few drops of mild liquid soap or dish soap to the water. Stir gently to create a light soapy mix. The soap helps break down the polish and cleans the nail surface. You can also add a small amount of olive oil for extra moisture. Soak Duration And Technique Place your fingertips into the warm soapy water. Let your nails soak for 15 to 20 minutes. Keep your hands submerged so the polish softens fully. Avoid moving your nails too much during soaking. This allows the water and soap to work effectively under the polish or artificial nail. Gently Lift Nails After Soaking After soaking, remove your fingers from the bowl. Use a soft cloth to dry your hands lightly. Take a wooden cuticle stick or orange stick. Gently lift the edges of the nail polish or fake nail. Do not force or pry harshly. If the polish or nail does not lift easily, soak again for a few more minutes. Patience prevents nail damage and keeps your nails healthy. Use Oils For Easy Removal Oils like olive or coconut help loosen nail glue for easy removal. Soak nails in warm oil, then gently lift edges to peel nails off. This method softens adhesive, making nails come off without harsh chemicals. Choose Between Olive, Castor, Or Vaseline Oils soften the glue under fake nails. Olive oil, castor oil, and Vaseline work well. Olive oil is easy to find and gentle on skin. Castor oil is thicker and breaks down adhesives faster. Vaseline acts as a strong lubricant to loosen nails. Pick one based on what you have at home. Apply Oil Around And Under Nails Use a cotton swab or your finger to apply oil. Gently rub it around the edges of each nail. Try to get some oil under the nail tips. This helps weaken the glue holding the nails on. Be careful not to push the fake nail up too hard. Let the oil sit for better results. Let Oil Break Down Adhesive Wait at least 10 to 15 minutes after applying oil. The oil seeps in and softens the adhesive. This makes the nails easier to remove without damage. Check if the nails start to lift on their own. If not, apply more oil and wait a bit longer. Then, gently wiggle the nail to remove it. Dental Floss Method For Stubborn Nails The dental floss method offers a clever way to remove stubborn nails without nail polish remover. It works well for press-on or acrylic nails that won’t budge. This technique uses dental floss to gently separate the nail from your natural nail bed. It is a simple, inexpensive, and effective option. Follow these steps carefully to avoid pain or damage. Use the right tools and take your time. The dental floss method requires patience but delivers good results. Lift Nail Edges With Cuticle Stick Start by softening the nail edges. Use a cuticle stick to gently lift the edges of the nail. Slide the stick under the edge carefully. Avoid forcing it to prevent nail or skin injury. This step creates a small gap needed to insert the dental floss. Saw Under Nail With Dental Floss Take a clean piece of dental floss about six inches long. Hold it with your fingers on both ends. Slide the floss under the lifted nail edge slowly. Move the floss back and forth like a saw. This motion loosens the glue or adhesive holding the nail. Continue until the nail starts to come off. Avoid Nail Damage During Removal Do not pull or yank the nail. Work gently to protect your natural nails. If you feel resistance or pain, stop and soak nails in warm water. This softens the glue and skin. Repeat the floss sawing slowly after soaking. Always take breaks to avoid hurting your nails or skin. Credit: www.youtube.com File And Buff Residual Glue After removing artificial nails or press-ons, sticky glue often remains on your natural nails. This residue can feel rough and look messy. Filing and buffing the leftover glue smooths the nail surface. It helps your nails stay healthy and ready for your next manicure. Using simple tools at home, you can gently remove glue without harsh chemicals. File Down Top Nail Layer Start with a gentle nail file. Lightly file the top layer of your nails. This process thins the glue and removes any thick spots. Avoid filing too hard to protect your natural nails. Use a fine-grit file for best results. Move the file in one direction to prevent damage. Buff Away Remaining Adhesive After filing, use a nail buffer to smooth the glue residue. Buffing removes smaller glue bits and evens out the surface. Choose a soft buffer for gentle abrasion. Work slowly across the nail until the glue fades. Keep nails dry and clean during … Read more

What is the fastest way to get nail polish out of carpet: We’ve Tried

What is the fastest way to get nail polish out of carpet

Have you just spilled nail polish on your carpet and are panicking about the stain? Don’t worry—you’re not alone, and the good news is that you can get it out faster than you think. Nail polish is tricky because it dries quickly and can leave a stubborn mark, but with the right approach, you can save your carpet without stress. You’ll discover the fastest, easiest way to remove nail polish from carpet using simple household items and smart techniques. Keep reading, and you’ll have your carpet looking spotless again in no time! Act Quickly Acting quickly is the key to removing nail polish from carpet. The faster you respond, the easier it becomes to clean the stain. Nail polish dries fast and can soak deep into the carpet fibers. Immediate action stops permanent damage and keeps your carpet looking fresh. Why Speed Matters Nail polish hardens quickly once spilled. The longer it stays, the harder it is to remove. Fresh stains sit on the surface, so they lift away easier. Dried polish binds tightly to carpet fibers and resists cleaning. Acting fast limits stain penetration and color loss. Quick response saves time and effort in cleaning. Initial Steps To Take Begin by blotting the spill gently with a clean cloth or paper towel. Do not rub, as this spreads the polish and pushes it deeper. Use a spoon or dull knife to carefully scrape off excess polish without damaging the carpet. Test any cleaning product on a hidden spot first. Use a small amount of nail polish remover or rubbing alcohol on a white cloth to dab the stain. Work from outside the spot inward to avoid spreading. Repeat dabbing until the polish starts to lift. Gather Essential Supplies Before tackling nail polish stains on carpet, gather the right supplies. Having everything ready speeds up the cleaning process. Quick action helps prevent the polish from setting deep into the fibers. Choose items that suit the type of stain and carpet fabric. Some materials are safe for common household products. Others may need specialized cleaners to avoid damage. Common Household Items Several items you already own work well for nail polish stains. Start with plain white cloths or paper towels to blot the spill. Avoid colored towels that might transfer dye to the carpet. Use non-acetone nail polish remover or rubbing alcohol. These gently lift the polish without harsh chemicals. Baking soda and club soda can help lighten fresh stains. Dish soap mixed with warm water breaks down polish residues. Keep a small spoon or dull knife nearby to carefully scrape off excess polish. A soft-bristle brush helps with gentle scrubbing without harming carpet fibers. Specialized Cleaning Products Some stains require stronger or targeted cleaners. Look for carpet stain removers designed specifically for nail polish or paint. Products like Ink Out or professional carpet stain removers are effective options. Always test specialized products on a hidden carpet area first. This checks for color fading or fiber damage. Follow manufacturer instructions to avoid overuse or residue buildup. Having gloves and a spray bottle of water ready aids in quick application and rinsing. These supplies improve cleaning success and keep your carpet safe. Remove Wet Nail Polish Wet nail polish spills on carpet need quick action. The faster you act, the easier it is to remove the stain. Wet polish is still liquid and can spread if not handled carefully. Using the right method helps avoid damage to your carpet fibers. Start by gently removing as much polish as possible without rubbing. Then, use safe cleaning solutions to lift the stain. Avoid harsh scrubbing, which can push the polish deeper into the carpet. Blotting Techniques Blot the wet nail polish immediately with a clean, white cloth or paper towel. Press down gently to soak up the polish. Do not rub, as this spreads the stain and damages carpet fibers. Use fresh sections of the cloth to blot repeatedly. Keep blotting until no more polish transfers to the cloth. This helps remove excess polish before applying any cleaning products. Using Nail Polish Remover Safely Choose a nail polish remover without acetone to protect carpet colors. Test the remover on a small, hidden area first. This ensures it will not bleach or damage your carpet. Apply the remover sparingly with a cotton ball or cloth. Dab gently on the stain without soaking the carpet. Blot the area afterward with a clean cloth to lift the polish and remover residue. Repeat the process carefully until the stain fades. Avoid overusing remover to prevent carpet damage. Finish by rinsing with cold water and blotting dry. Credit: www.youtube.com Tackle Dried Nail Polish Dried nail polish on carpet can be tough to remove. It sets quickly and sticks deeply into the fibers. Acting carefully is key to avoid damage. The right steps help lift the polish without spreading the stain or ruining carpet color. Here are simple ways to tackle dried nail polish fast and safely. Scraping Excess Polish Start by gently scraping off any thick polish. Use a dull knife or spoon to lift the dried layer. Avoid pressing hard to prevent pushing polish deeper. Remove as much as possible before applying liquids. This step makes later cleaning easier and more effective. Applying Acetone Or Alcohol Use clear acetone or rubbing alcohol to break down the polish. Put a small amount on a white cloth or cotton ball. Dab the stained area softly without rubbing. Let the liquid sit for a minute to dissolve polish. Blot with a clean cloth to lift loosened polish. Repeat carefully until the stain fades. Test first on a hidden carpet spot to check for color loss. Alternative Solutions If acetone or alcohol is unsafe, try mild options. Mix club soda with baking soda to form a paste. Apply to the stain and scrub gently with a soft brush. Another option is hair gel, which can loosen polish when left to sit. Commercial carpet stain removers may also help. Always test any … Read more

How to Take off Acrylic Nails Without Acetone: User Approved

You love the look of acrylic nails, but when it’s time to take them off, you hesitate. Acetone can be harsh on your skin and nails, and maybe you don’t have any on hand. What if there was a gentler way to remove your acrylics without the strong chemical smell or dryness? You’re in the right place. This guide will show you simple, safe methods to take off your acrylic nails at home without using acetone. Keep reading, and you’ll learn easy steps that protect your natural nails and keep them healthy—no harsh chemicals needed. Credit: www.youtube.com Prepare Your Nails Start by gently filing the shiny top layer to help loosen the acrylic. Warm, soapy water softens the nails, making removal easier. Use a cuticle stick to carefully lift the edges without harming your natural nails. Preparing your nails is the first step to safely remove acrylic nails without acetone. This step makes the removal process easier and less damaging. Start by cleaning your nails and removing any polish. Clean nails help the removal method work better and protect your natural nails. Gather Supplies Collect all the tools before you begin. You will need a nail clipper, a coarse nail file, a bowl of warm water, soap, a cuticle stick, and a soft towel. Having everything ready saves time and keeps the process smooth. Use gentle tools to avoid hurting your skin or nails. Trim And File Acrylics Trim your acrylic nails short using the nail clipper. Short nails are easier to remove and cause less damage. Next, use the coarse nail file to file down the top shiny layer of the acrylic. This helps warm water and soap soak in better. File gently to avoid scraping your natural nails. Focus on thinning the acrylic, not removing it completely yet. Soaking Methods Soaking methods offer a gentle way to remove acrylic nails without using acetone. These techniques soften the acrylic glue and layers, making it easier to lift the nails off. Patience is key with soaking methods, as they take time but cause less damage to natural nails. Below are simple soaking methods you can try at home with common household ingredients. Warm Soapy Water Soak Fill a bowl with warm water and add a few drops of mild liquid soap. Stir to create a soapy solution. Soak your nails in the warm water for 20 to 30 minutes. The warm water softens the acrylic, while the soap helps break down the glue. After soaking, gently try to lift the edges of the acrylic nails with a wooden stick. Avoid forceful pulling. Repeat soaking if the nails do not come off easily. Oil And Soap Mixture Soak Mix equal parts of cooking oil and liquid soap in a small bowl. Warm the mixture slightly for better effect. Soak your nails in this blend for 20 to 30 minutes. The oil moisturizes your nails and skin while loosening the acrylic. Soap helps dissolve the glue. After soaking, softly push the acrylic edges to check if they lift. Do not rush the process. Using Cuticle Oil Apply a generous amount of cuticle oil around your nail edges. Massage the oil gently into the skin and under the acrylic. Let it sit for 15 to 20 minutes to penetrate the glue. Cuticle oil softens the acrylic and nourishes your nails. You can repeat this treatment several times a day. After a few sessions, try to lift the acrylic slowly with a wooden stick. Mechanical Removal Mechanical removal offers a safe way to take off acrylic nails without acetone. It involves gently loosening and removing the acrylic manually. This method helps protect your natural nails from harsh chemicals and dryness. Patience and care are important to avoid damage or pain. Gently Prying Acrylic Nails Start by softening the edges of the acrylic nails. Use warm water to soak your fingers for about 10 minutes. This helps loosen the glue holding the acrylic. Then, carefully lift the edge of the acrylic nail using your fingernail or a soft tool. Avoid forcing it, as this can hurt your natural nails. Work slowly to pry the acrylic away little by little. Using Orangewood Stick Or Cuticle Pusher Choose an orangewood stick or a cuticle pusher to help lift the acrylic further. Insert the tool gently under the edge of the acrylic nail. Push softly to separate the acrylic from the natural nail. Keep the tool flat to prevent scratching or digging into your nail bed. Repeat this process around the nail until the acrylic starts lifting evenly. Filing Remaining Residue After removing most acrylic pieces, some residue may remain on your nails. Use a fine-grit nail file to smooth out the leftover acrylic. File gently to avoid thinning or damaging your natural nail. Finish by washing your hands and applying cuticle oil or moisturizer. This step helps restore moisture and keeps your nails healthy. Credit: www.youtube.com Alternative Techniques Removing acrylic nails without acetone is possible using simple, safe methods. These alternative techniques help loosen the acrylic gently. They avoid harsh chemicals and protect your natural nails. Each method requires patience and care. Choose one that fits your tools and time. Avoid force to prevent nail damage. Dental Floss Method Start by filing the top layer of the acrylic nails. This helps the floss slide underneath easily. Take a piece of dental floss and gently work it under the edge of the acrylic nail. Use a slow back-and-forth motion to lift the acrylic. Be careful not to hurt your skin or natural nail. This method works best if the acrylic already shows some lifting. Peeling And Lifting Edges Check if the edges of your acrylic nails are loose or peeling. Use a cuticle stick to gently lift these edges. Slowly peel the acrylic from the nail surface. Do this in small sections to avoid pain or damage. Stop if you feel resistance. Let your nails rest before trying again. This method works well if acrylic nails are … Read more

How Can You Make Nail Polish Dry Faster​: Expert Tips Revealed

Waiting for your nail polish to dry can feel like forever, especially when you’re eager to show off your fresh manicure or get on with your day. But what if you could speed up that drying time without smudges or mess? You’re about to discover simple, effective tricks that actually work to make your nail polish dry faster—no fancy gadgets or expensive products needed. Ready to save time and keep your nails flawless? Keep reading to find out how you can get perfectly dry nails in a flash! Credit: www.wikihow.com Apply Thin Coats Applying thin coats of nail polish is a smart way to speed up drying time. Thick layers trap moisture and take longer to dry. Thin coats let air reach the polish easily, helping it set faster. This simple step can make your manicure quicker and smoother. Why Thin Layers Dry Faster Thin layers have less liquid, so they dry quickly. Thick coats stay wet longer because the polish is deeper. Air touches thin coats more, helping evaporation. This means your nails dry faster and are less likely to smudge. Thin coats also reduce bubbles and streaks. How To Achieve Even Coverage Start with a small amount of polish on your brush. Use three strokes: one down the middle, one on each side. Don’t overload the brush or polish will pool. Let each layer dry before adding the next thin coat. This keeps the polish smooth and even. Practice steady, gentle strokes for a neat finish. Use Quick-dry Top Coats Using quick-dry top coats is a simple way to speed up nail polish drying time. These products create a protective layer that hardens fast. This layer helps seal the color and prevents smudging. Applying a quick-dry top coat right after your nail polish makes your manicure dry much faster. It also gives your nails a shiny, smooth finish. Benefits Of Fast-drying Top Coats Fast-drying top coats reduce waiting time after painting nails. They help protect your polish from chips and scratches. These top coats improve the shine and look of your nails. They also make your manicure last longer. Using them means less chance of ruining your fresh nail polish. Quick-dry top coats work well with most nail polish types. Best Products To Try Some popular quick-dry top coats include Seche Vite Dry Fast Top Coat and Sally Hansen Insta-Dri Top Coat. Essie Quick-e Drying Top Coat is another good option for fast drying. These products are easy to find in many stores or online. They offer reliable results and a glossy finish. Trying one of these can help you get dry nails faster. Try Drying Drops And Sprays Drying drops and sprays offer a quick solution to speed up nail polish drying. These products work by speeding up the evaporation of the polish’s liquid components. They help nails dry faster without smudging or ruining your manicure. Using drying drops or sprays is a simple step that fits easily into your nail routine. How Drying Drops Work Drying drops contain ingredients that help polish dry quickly. They reduce the time it takes for the polish to harden. When applied, they form a thin, protective layer over the polish. This layer speeds up evaporation and prevents smudges. Drops and sprays also add shine and smoothness to your nails. When To Apply Them Apply drying drops or sprays after your last nail polish coat. Wait about one minute after finishing the polish. Gently place a drop on each nail or spray a light mist over them. Avoid rubbing or touching the nails after application. This ensures the product works effectively and your nails dry faster. Credit: www.opi.com Dip Nails In Ice Water Dipping your nails in ice water is a simple and effective way to speed up nail polish drying. The cold water helps harden the polish quickly, reducing the waiting time. This method works best when you follow the right steps and timing. Preparing The Ice Water Bath Fill a small bowl with cold water and add ice cubes. The water should be very cold but not freezing. Stir the water gently to keep it evenly chilled. Make sure the bowl is large enough to fit your fingers comfortably. Timing For Best Results After applying nail polish, wait about two minutes for it to set slightly. Then dip your nails into the ice water for two to three minutes. Keep your fingers still during this time. Remove your nails and let them air dry for a few more minutes for a smooth finish. Blast Nails With Cold Air Blasting your nails with cold air is a simple trick to speed up drying. It cools down the polish, helping it harden faster. This method is easy to do at home and needs no special tools. Using A Cool Hairdryer Set your hairdryer to the cool air setting. Hold it about six inches from your nails. Move it slowly over each nail for one to two minutes. The cold air helps solidify the polish without melting it. Avoid using hot air, as it can cause smudges or bubbles. Benefits Of Cold Air Cold air lowers the temperature of the nail polish. This quickens the drying process and reduces waiting time. It also prevents polish cracks that happen with fast drying under heat. Cold air is gentle on your skin and polish. It keeps your manicure neat and smooth. Use Cooking Spray Hacks Cooking spray is a surprising trick to dry nail polish quickly. It works by creating a thin, even layer that helps the polish harden faster. This simple hack can save you time and reduce smudges. How Cooking Spray Speeds Drying Cooking spray contains oils that help the polish dry faster. When you spray a light mist over wet nails, it forms a smooth barrier. This barrier stops air from slowing the drying process. The polish hardens quicker and stays smooth without streaks. The spray cools the polish slightly. Cooler polish dries faster than warm polish. The quick cooling … Read more

10 Best Dresses for Short Curvy Women to Flaunt Your Style Confidently

10 Best Dresses for Short Curvy Women

Finding the perfect dress as a short, curvy woman can feel like an endless struggle. Many dresses don’t fit right, making you feel uncomfortable or self-conscious. You might spend hours searching, only to end up with clothes that don’t flatter your shape or suit your style. But it doesn’t have to be this way. The right dress can boost your confidence and make you feel beautiful every day. It fits perfectly, highlights your curves, and lets you move with ease. Whether for work, a wedding, or a casual outing, the right dress changes how you feel about dressing up. In this review, you’ll find the 10 best dresses designed especially for short, curvy women. Keep reading to discover styles that celebrate your shape and make dressing a joyful experience. Sampeel Summer Dress For Women The Sampeel Summer Dress for Women 2024 is ideal for women seeking a versatile, stylish dress suitable for both work and casual occasions. If you want a comfortable yet elegant outfit for events like weddings, office meetings, or everyday wear, this short sleeve mini dress in classic black is a perfect choice. Pros: Elegant and timeless black color that suits various occasions Lightweight and breathable fabric ideal for summer wear Flattering mini dress length with comfortable short sleeves Versatile design suitable for both work and wedding guest attire High-quality craftsmanship from the trusted Sampeel brand Cons: Limited color option available only in black May require careful styling for very formal work environments The Sampeel Summer Dress combines style and practicality, making it an excellent addition to any wardrobe. Its breathable fabric keeps you cool during warm weather, while the short sleeves and mini length offer a modern, flattering silhouette. Whether attending a casual office day or a summer wedding, this dress adapts seamlessly to different settings. Moreover, the dress’s simple yet elegant design ensures easy accessorizing, allowing users to create multiple looks with minimal effort. The trusted Sampeel brand guarantees durability and quality, providing confidence in your purchase. Overall, this dress is a smart investment for women who want a chic, multipurpose summer outfit. Wiholl Summer Outfits For Women Plus Size Dresses The WIHOLL Summer Outfits for Women Plus Size Dresses are perfect for curvy women seeking stylish and comfortable clothing options. Ideal for those who want a versatile dress suitable for casual occasions, weddings, garden parties, beach trips, or resort wear, this dress combines fashion with practicality. If you are looking for a flattering plus size dress that embraces your curves while offering breathability and style, this is an excellent choice. Pros: Flattering V Neck design enhances the neckline and complements curvy figures. Made with breathable fabric ideal for spring and summer wear. Short sleeves provide comfort and ease of movement in warm weather. Attractive 5-mandala Boho Print adds a trendy and unique touch. Versatile for multiple occasions including weddings, beach travel, and resort wear. Available in 3XL, catering specifically to plus size women. Cons: Limited color options with only the mandala boho print available. May require careful washing to maintain the vibrant print and fabric quality. The WIHOLL Plus Size Dress is thoughtfully designed to celebrate curves without compromising on style or comfort. The V neck and short sleeve design allow for a flattering silhouette that breathes well in warmer climates. Whether attending a casual garden party or a beach resort vacation, the dress offers a relaxed yet elegant look that enhances confidence. The unique 5-mandala boho print makes it stand out, adding a bohemian flair that is both modern and timeless. Additionally, the dress’s versatility is one of its strongest features. It easily transitions from a casual day outfit to a wedding guest ensemble, making it an excellent wardrobe staple for plus size women. The choice of breathable fabric ensures comfort throughout the day, while the 3XL sizing guarantees an accommodating fit. All these features come together to provide a dress that is both practical and fashionable for women who want to look and feel their best during the warmer seasons. Eytino Plus Size Dresses For Curvy Women The Eytino Plus Size Dresses for Curvy Women Ruffle Cap Sleeve Lace V Neck Swing A Line Mini Short Dress in 1X White is ideal for curvy women looking for a stylish and comfortable dress that enhances their natural shape. This dress is perfect for those who want to feel confident and elegant at casual gatherings, parties, or special occasions. If you value both fashion and fit, this dress is designed to flatter your curves while providing ease of movement. Pros: Flattering V Neck design that enhances the neckline. Elegant ruffle cap sleeves adding a feminine touch. Comfortable swing A-line silhouette that suits curvy figures. Delicate lace detailing for a sophisticated look. Lightweight design, weighing only about 0.44 pounds, ensuring comfort all day. Cons: Limited color option, available only in white. Mini length may not be preferred by those seeking more coverage. This Eytino plus size dress features a beautifully crafted lace fabric that adds texture and elegance, perfect for women who want to stand out in a crowd. The cap sleeves with ruffle details contribute to a delicate and charming look, enhancing the overall design without compromising comfort. Its A-line swing cut allows for a flattering fit that gently skims over the hips and thighs, making it ideal for curvy body types. Beyond aesthetics, the dress’s lightweight material ensures breathability and ease of wear throughout the day or evening. The V neck design not only elongates the neck but also adds a touch of sophistication, making it versatile enough for both casual outings and more formal events. Overall, this dress combines style, comfort, and a flattering fit, catering specifically to the needs of curvy women who want to feel beautiful and confident. In’voland Women Plus Size Short Sleeve Dress The IN’VOLAND Women Plus Size Short Sleeve Dress is perfect for women seeking a comfortable yet stylish option for warm weather. Ideal for plus-size individuals who appreciate casual, flowy attire, this dress offers a … Read more

How to Prep Nails for Gel Polish​: Expert Tips for Lasting Shine

how to prep nails for gel polish​

Getting the perfect gel polish starts long before you open the bottle. How you prep your nails can make all the difference between a flawless, long-lasting finish and a polish that chips or peels within days. If you want your gel manicure to look salon-fresh for weeks, you need to follow the right steps to prepare your nails properly. In this guide, you’ll learn simple, easy-to-follow tips that ensure your gel polish adheres perfectly and lasts longer. Ready to transform your nails and avoid common mistakes? Keep reading to discover how to prep your nails for gel polish like a pro. Credit: yokefellowbeauty.com Clean And Dry Hands Clean and dry hands create the perfect base for gel polish. Dirt, oils, and moisture block polish from sticking well. This step helps the gel last longer and look smooth. Start by washing hands with warm water and gentle soap. Remove all traces of lotion and dirt. Dry hands completely using a clean towel or air dry to avoid leaving fibers on nails. Remove Oils And Residue Oils from skin or lotion stop gel polish from bonding. Use a nail cleanser or rubbing alcohol on a lint-free wipe. Wipe each nail thoroughly to remove oils and dust. Ensure Nails Are Fully Dry Wet nails cause polish to lift or bubble. After cleansing, wait a few seconds for nails to air dry. Avoid touching nails with wet fingers or damp towels. Sanitize Your Hands Sanitizing kills germs and ensures nails stay clean during application. Use an alcohol-based hand sanitizer. Rub it over your hands and nails, then let it dry completely. Shape Nails Shaping nails is the first step in prepping them for gel polish. It sets the foundation for a smooth and polished look. Proper shaping makes nails look neat and helps gel polish last longer. Choose a nail shape that fits your style and hand shape. Popular shapes include square, round, oval, and almond. Each shape gives a different vibe and suits different nail beds. Choose Your Nail Shape Decide on a shape before filing. Round shapes are soft and natural. Square shapes look bold and sharp. Oval and almond shapes offer elegance and length. File Nails Evenly Use a fine-grit nail file to shape nails. File in one direction to avoid splitting. Avoid using a back-and-forth motion. This keeps nails strong and smooth. Check Nail Length Keep nails at a comfortable length. Long nails can break easily. Short nails are easier to maintain. Make sure both hands have similar length for balance. Smooth Edges Gently smooth the edges after shaping. This prevents snags and rough spots. A smooth surface helps gel polish apply evenly. Push Back Cuticles Pushing back cuticles is a key step to prepare nails for gel polish. It helps create a clean, smooth surface for polish application. Proper cuticle care prevents lifting and peeling of the gel polish. This process also makes nails look neat and healthy. Use Cuticle Pusher Start by using a cuticle pusher to gently push back the cuticles. Choose a tool with a soft, rounded edge to avoid damage. Hold the tool at a slight angle and push the cuticles away from the nail bed. Do this slowly and carefully to protect the nail and skin. Remove Dead Skin Check for any dead skin around the nail edges. Use a cuticle remover or a soft brush to clean away dry, loose skin. Removing dead skin makes the nail surface smooth and ready for polish. It also helps the gel polish stick better and last longer. Trim Cuticles Carefully After pushing back cuticles, trim any excess skin with cuticle nippers. Only cut the loose skin to avoid injury or infection. Trim small amounts at a time to keep the nail area clean and tidy. Proper trimming ensures a neat look and helps polish adhere well. Buff Nail Surface Buffing the nail surface is a key step before applying gel polish. It helps the polish stick better and last longer. Buffing creates a smooth, even base by removing oils and shine from the nail. This process also helps prevent lifting and chipping. Doing it right protects your natural nails and improves the final look. Remove Shine Gently Use a fine-grit buffer to remove the natural shine of your nails. Buff lightly in one direction to avoid damage. The goal is to dull the surface, not to file down the nail. Removing the shine allows the gel polish to bond properly. Take your time and be gentle for the best results. Avoid Over-buffing Buffing too hard or too long can weaken nails. Over-buffing thins the nail plate and causes sensitivity. It also increases the risk of peeling and breakage. Stop buffing once the surface is matte and smooth. Protect your natural nails by keeping buffing light and controlled. Clean Nail Dust Cleaning nail dust is an important step before applying gel polish. Dust left on nails can prevent the polish from sticking well. It can also cause bumps and uneven surfaces. Removing all dust ensures a smooth and long-lasting gel manicure. Use Lint-free Wipes Lint-free wipes help remove nail dust without leaving fibers behind. They clean the nail surface thoroughly. Use them with a nail cleanser or alcohol to wipe each nail. This step prepares nails for better polish adhesion and a flawless finish. Avoid Cotton Fibers Cotton fibers can stick to nails and cause problems under gel polish. These tiny fibers create bumps and rough spots. Avoid cotton balls or pads when cleaning nails. Choose lint-free options to keep nails clean and smooth for gel polish application. Dehydrate Nails Dehydrating nails is a key step before applying gel polish. It removes moisture and oils that prevent proper adhesion. Nails free of moisture help gel polish last longer and resist chipping. This step ensures a smooth surface for the polish to stick to. Without dehydration, gel polish may lift or peel quickly. Apply Nail Dehydrator Use a nail dehydrator to dry the nail surface. Apply it … Read more

How to Make Gel Nails Last Longer: Expert Tips for Durable Shine

how to make gel nails last longer​

You’ve just got your gel nails done, and they look flawless. But how do you keep that fresh, glossy finish for weeks without worrying about chips or lifting? If you’re tired of seeing your beautiful gel manicure peel or fade too soon, you’re not alone. The good news is, with the right steps before, during, and after your gel nail appointment, you can make your gel nails last much longer. You’ll discover simple, practical tips that nail pros swear by—so you can enjoy strong, stunning nails that hold up through all your daily activities. Ready to make your gel nails last? Let’s dive in! Nail Preparation Proper nail preparation is the foundation for gel nails that stay flawless for weeks. Skipping or rushing through this step can lead to premature chipping and lifting. Taking a few extra minutes to prep your nails properly makes a big difference in how long your gel manicure lasts. Clean And Dehydrate Nails Start with clean nails free from oils, lotions, or sweat. Use a nail cleanser or rubbing alcohol to wipe each nail thoroughly. This removes natural oils that prevent gel polish from adhering properly. Next, apply a nail dehydrator. This product helps strip away any lingering moisture, creating a dry surface that gel can bond to. Without dehydration, your gel polish may peel off quickly even if applied perfectly. Buff Nail Surface Gently buffing your nail surface removes the shiny top layer. This creates tiny grooves that give the gel polish something to grip onto. Use a fine-grit buffer and work lightly—too much buffing can thin your nails and cause damage. Think of it as prepping a canvas before painting. Without this step, your gel polish can slide off easily, no matter how many coats you apply. A smooth, matte surface is what you want before moving to polish application. Remove Cuticle Residue Cuticle residue and dead skin act as barriers between your natural nail and gel polish. Use a cuticle pusher or orangewood stick to gently push back and remove any excess cuticle. Avoid cutting too aggressively to prevent irritation. Leaving cuticle residue behind can cause your gel to lift along the edges. Have you ever noticed your gel nails peeling near the cuticles? That’s often the culprit. Cleaning this area well helps your manicure stay intact longer. Credit: www.nailpolishdirect.co.uk Application Techniques Application techniques play a vital role in how long gel nails last. Proper steps during application help prevent lifting and chipping. Small details make a big difference. Follow these tips to improve your gel manicure’s durability. Apply Thin Coats Thin coats of gel polish cure better under UV or LED light. Thick layers may not dry properly. This causes bubbles, wrinkling, and peeling. Apply each layer evenly and sparingly. Let the light cure the polish fully before adding the next coat. Cap The Nail Edges Capping the edges seals the polish at the tip. Brush the base, color, and top coats over the free edge. This creates a barrier that stops water and dirt from getting underneath. Capping helps stop premature lifting and extends the life of your gel nails. Avoid Polishing Cuticles Keep polish away from cuticles and skin. Polishing cuticles leads to lifting and peeling. Leave a small gap between the polish and cuticle line. This allows the gel to bond directly to the nail plate. Clean edges create a neat, lasting finish. Proper Curing Proper curing is essential to make gel nails last longer. It ensures the polish hardens completely. This creates a strong, durable finish that resists chipping and lifting. Without proper curing, gel nails may peel or wear off quickly. Understanding the curing process helps you get the best results from your gel manicure. Use Quality Led/uv Lamp A good LED or UV lamp is key for proper curing. Cheap lamps may not cure polish evenly. This can cause sticky or soft spots on your nails. Choose a lamp that matches your gel polish brand. High-quality lamps cure polish faster and more thoroughly. This improves the nail’s strength and shine. Cure Each Layer Fully Curing each layer fully is important. Thin layers dry faster and cure better. Spend the full recommended time under the lamp for every coat. This includes base, color, and top coats. Skipping or shortening curing time weakens the gel’s hold. Fully cured layers last longer and resist damage. Avoid Thick Layers Apply thin layers of gel polish. Thick layers take longer to cure and may stay soft inside. Soft gel lifts or peels easily. Thin coats cure evenly and create a smooth finish. Apply multiple thin layers rather than one thick one. This helps gel nails stay intact for weeks. Aftercare Tips Proper aftercare keeps gel nails strong and shiny for weeks. Simple habits help avoid lifting and chipping. Follow these tips to protect your manicure daily. Apply Cuticle Oil Daily Cuticle oil nourishes skin around your nails. It stops dryness and peeling. Massage oil into cuticles each day. This keeps nails flexible and less likely to break. Healthy cuticles support long-lasting gel polish. Wear Gloves For Chores Household chores expose nails to water and chemicals. These weaken gel polish and cause lifting. Wear gloves when washing dishes or cleaning. Gloves act as a barrier to protect your nails. Use them every time you do wet tasks. Avoid Using Nails As Tools Using nails to open cans or scratch surfaces damages gel polish. This causes chips and cracks. Use proper tools instead of your nails. Treat your manicure gently to keep it intact. Your gel nails will stay perfect longer. Choosing The Right Products Choosing the right products is key to making gel nails last longer. The quality and compatibility of your gel nail products affect durability. Using mismatched or low-quality items can cause peeling and chipping. Invest in good base coats, gel polishes, and top coats designed to work together. This ensures a strong bond and smooth finish. Also, consider builder gels to add strength to your nails. Each … Read more