Getting the perfect gel polish starts long before you open the bottle. How you prep your nails can make all the difference between a flawless, long-lasting finish and a polish that chips or peels within days.
If you want your gel manicure to look salon-fresh for weeks, you need to follow the right steps to prepare your nails properly. In this guide, you’ll learn simple, easy-to-follow tips that ensure your gel polish adheres perfectly and lasts longer.
Ready to transform your nails and avoid common mistakes? Keep reading to discover how to prep your nails for gel polish like a pro.

Credit: yokefellowbeauty.com
Clean And Dry Hands
Clean and dry hands create the perfect base for gel polish. Dirt, oils, and moisture block polish from sticking well. This step helps the gel last longer and look smooth.
Start by washing hands with warm water and gentle soap. Remove all traces of lotion and dirt. Dry hands completely using a clean towel or air dry to avoid leaving fibers on nails.
Remove Oils And Residue
Oils from skin or lotion stop gel polish from bonding. Use a nail cleanser or rubbing alcohol on a lint-free wipe. Wipe each nail thoroughly to remove oils and dust.
Ensure Nails Are Fully Dry
Wet nails cause polish to lift or bubble. After cleansing, wait a few seconds for nails to air dry. Avoid touching nails with wet fingers or damp towels.
Sanitize Your Hands
Sanitizing kills germs and ensures nails stay clean during application. Use an alcohol-based hand sanitizer. Rub it over your hands and nails, then let it dry completely.
Shape Nails
Shaping nails is the first step in prepping them for gel polish. It sets the foundation for a smooth and polished look. Proper shaping makes nails look neat and helps gel polish last longer.
Choose a nail shape that fits your style and hand shape. Popular shapes include square, round, oval, and almond. Each shape gives a different vibe and suits different nail beds.
Choose Your Nail Shape
Decide on a shape before filing. Round shapes are soft and natural. Square shapes look bold and sharp. Oval and almond shapes offer elegance and length.
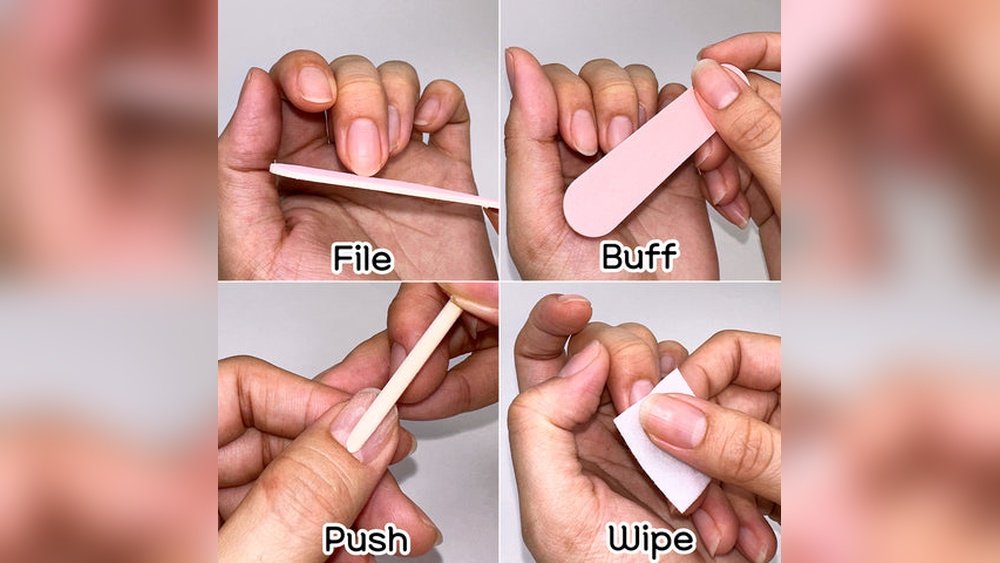
File Nails Evenly
Use a fine-grit nail file to shape nails. File in one direction to avoid splitting. Avoid using a back-and-forth motion. This keeps nails strong and smooth.
Check Nail Length
Keep nails at a comfortable length. Long nails can break easily. Short nails are easier to maintain. Make sure both hands have similar length for balance.
Smooth Edges
Gently smooth the edges after shaping. This prevents snags and rough spots. A smooth surface helps gel polish apply evenly.
Push Back Cuticles
Pushing back cuticles is a key step to prepare nails for gel polish. It helps create a clean, smooth surface for polish application. Proper cuticle care prevents lifting and peeling of the gel polish. This process also makes nails look neat and healthy.
Use Cuticle Pusher
Start by using a cuticle pusher to gently push back the cuticles. Choose a tool with a soft, rounded edge to avoid damage. Hold the tool at a slight angle and push the cuticles away from the nail bed. Do this slowly and carefully to protect the nail and skin.
Remove Dead Skin
Check for any dead skin around the nail edges. Use a cuticle remover or a soft brush to clean away dry, loose skin. Removing dead skin makes the nail surface smooth and ready for polish. It also helps the gel polish stick better and last longer.
Trim Cuticles Carefully
After pushing back cuticles, trim any excess skin with cuticle nippers. Only cut the loose skin to avoid injury or infection. Trim small amounts at a time to keep the nail area clean and tidy. Proper trimming ensures a neat look and helps polish adhere well.
Buff Nail Surface
Buffing the nail surface is a key step before applying gel polish. It helps the polish stick better and last longer. Buffing creates a smooth, even base by removing oils and shine from the nail. This process also helps prevent lifting and chipping. Doing it right protects your natural nails and improves the final look.
Remove Shine Gently
Use a fine-grit buffer to remove the natural shine of your nails. Buff lightly in one direction to avoid damage. The goal is to dull the surface, not to file down the nail. Removing the shine allows the gel polish to bond properly. Take your time and be gentle for the best results.
Avoid Over-buffing
Buffing too hard or too long can weaken nails. Over-buffing thins the nail plate and causes sensitivity. It also increases the risk of peeling and breakage. Stop buffing once the surface is matte and smooth. Protect your natural nails by keeping buffing light and controlled.
Clean Nail Dust
Cleaning nail dust is an important step before applying gel polish. Dust left on nails can prevent the polish from sticking well. It can also cause bumps and uneven surfaces. Removing all dust ensures a smooth and long-lasting gel manicure.
Use Lint-free Wipes
Lint-free wipes help remove nail dust without leaving fibers behind. They clean the nail surface thoroughly. Use them with a nail cleanser or alcohol to wipe each nail. This step prepares nails for better polish adhesion and a flawless finish.
Avoid Cotton Fibers
Cotton fibers can stick to nails and cause problems under gel polish. These tiny fibers create bumps and rough spots. Avoid cotton balls or pads when cleaning nails. Choose lint-free options to keep nails clean and smooth for gel polish application.
Dehydrate Nails
Dehydrating nails is a key step before applying gel polish. It removes moisture and oils that prevent proper adhesion. Nails free of moisture help gel polish last longer and resist chipping. This step ensures a smooth surface for the polish to stick to. Without dehydration, gel polish may lift or peel quickly.
Apply Nail Dehydrator
Use a nail dehydrator to dry the nail surface. Apply it with a clean brush or wipe. Cover the entire nail plate, avoiding the skin. Let it air dry for a few seconds. This product removes natural oils and moisture. It prepares nails for better gel polish grip.
Prevent Oil Contamination
Keep nails free from oils after dehydration. Avoid touching nails with fingers or lotions. Use cotton pads or lint-free wipes to handle nails. Oil contamination weakens gel polish adhesion. Work in a clean area to reduce dust and grease. This step helps gel polish stay fresh and last longer.
Apply Primer Or Bonder
Applying a primer or bonder is a key step before gel polish. It prepares the nail surface for better adhesion. This step helps the gel polish last longer and prevents peeling or lifting.
Primers and bonders create a sticky base that bonds the gel polish to your natural nails. They also remove oils and moisture that can weaken the polish grip. Use a small amount for best results. Too much can cause problems.
Avoid Skin Contact
Keep primer or bonder away from your skin and cuticles. Contact with skin can cause irritation or allergic reactions. It also stops the gel polish from sticking properly. Apply carefully using a thin brush. Focus only on the nail plate.
If any primer touches your skin, wipe it off immediately with a lint-free wipe. This keeps your manicure safe and neat. Proper application helps your nails stay healthy and your polish flawless.
Ensure Proper Adhesion
Use primer or bonder after cleaning and dehydrating your nails. This step removes oils and moisture, improving polish grip. Apply a thin, even layer over the entire nail surface. Avoid pooling or thick spots.
Let the primer dry completely before applying gel polish. It should feel slightly tacky but not wet. This tackiness helps the gel polish bond securely. Proper adhesion prevents chipping and extends the life of your manicure.
Common Prep Mistakes
Preparing your nails correctly is key for a smooth and long-lasting gel polish. Many people make simple mistakes during the prep process. These errors can cause the gel polish to lift, chip, or peel quickly. Avoiding common prep mistakes helps your manicure stay flawless and fresh for weeks.
Skipping Cuticle Removal
Cuticles block the gel polish from sticking well. Leaving them on the nail surface causes peeling. Gently push back and remove excess cuticles before applying gel polish. This step creates a clean base and improves polish adhesion. Do not cut too much to avoid injury.
Applying Thick Layers
Thick gel polish takes longer to cure and may not dry evenly. It can bubble or peel off soon after application. Apply thin, even layers instead. Thin coats cure faster and bond better to the nail. Multiple thin layers build a strong and smooth finish.
Using Old Lamps
Old or weak UV/LED lamps may not cure gel polish properly. This leads to soft or sticky nails that chip easily. Check your lamp’s power and replace bulbs if needed. Use a high-quality lamp that cures gel polish fully in the recommended time.
Ignoring Nail Edges
Skipping the nail edges causes the gel polish to lift quickly. Make sure to seal the tips by brushing polish over the edges. This locks in the gel and prevents chipping. Cover the entire nail surface, including sides and tips, for longer wear.
Tools Needed
Preparing your nails properly is key for a smooth gel polish application. Having the right tools makes this task easier and more effective. Each item plays a specific role in ensuring your gel polish lasts longer and looks flawless.
Nail File And Buffer
A nail file helps shape your nails to your desired length and style. Use it gently to avoid damaging the nail. The buffer smooths the nail surface by removing shine. This creates a perfect base for gel polish to stick better.
Cuticle Pusher And Nipper
A cuticle pusher gently pushes back the cuticles from the nail plate. This step creates more space for the polish. The cuticle nipper trims away excess or dead skin around the nail. Keeping cuticles neat prevents lifting and peeling of gel polish.
Lint-free Wipes
Lint-free wipes remove dust, oils, and residue after filing and buffing. Using these wipes prevents particles from sticking under the gel polish. They ensure the nail surface is clean and ready for dehydration and primer.
Dehydrator And Primer
A nail dehydrator removes natural oils and moisture from the nail surface. This step helps gel polish adhere better and last longer. The primer creates a sticky layer that bonds the gel polish to the nail. Use both for a strong, durable manicure.

Credit: www.youtube.com

Credit: www.amazon.com
Frequently Asked Questions
What Are Common Gel Polish Mistakes?
Common gel polish mistakes include poor nail prep, applying thick layers, using an old lamp, skipping edges, and ignoring the topcoat. Avoid peeling polish and neglecting the sticky layer for better results.
Can I Put Gel Nails Over Fungus?
Do not apply gel nails over a fungal infection. It can worsen the fungus and cause further nail damage. Treat the fungus first.
What Happens If You Don’t Buff Nails Before Gel?
Skipping buffing before gel can reduce polish adhesion and cause premature chipping or lifting. Buffing removes shine and oils.
What Should I Soak My Nails In Before Doing Gel Polish?
Soak your nails in acetone or nail polish remover to remove old polish and oils. Then, cleanse with a nail dehydrator before applying gel polish.
Conclusion
Proper nail prep sets the stage for a long-lasting gel manicure. Clean, shape, and gently buff your nails for better polish grip. Push back cuticles carefully to avoid lifting. Use a primer or bonder to enhance adhesion. Avoid skipping any step to prevent chipping or peeling.
Taking time to prep nails well saves effort later. Enjoy smooth, shiny gel nails that stay flawless longer. Simple steps make a big difference in your manicure’s durability. Keep practicing these basics for salon-quality results at home.